In this guide
What you need
- A Shopify store
- Your logo (PNG, SVG or WebP, 512 × 512 pixels or larger) and your brand colour
- For Android: a Google Play developer account ($25 once, paid to Google — see step 16)
- For iOS: an Apple Developer Program membership ($99 a year, paid to Apple — see step 10)
Tip: Apple and Google verify identity and organization records (which can take 24–72 hours). If you do not have developer accounts yet, you can start enrollment now while configuring your app.
Part 1
Create your account
Takes two minutes. You need an email address you can open now.
1Create your account
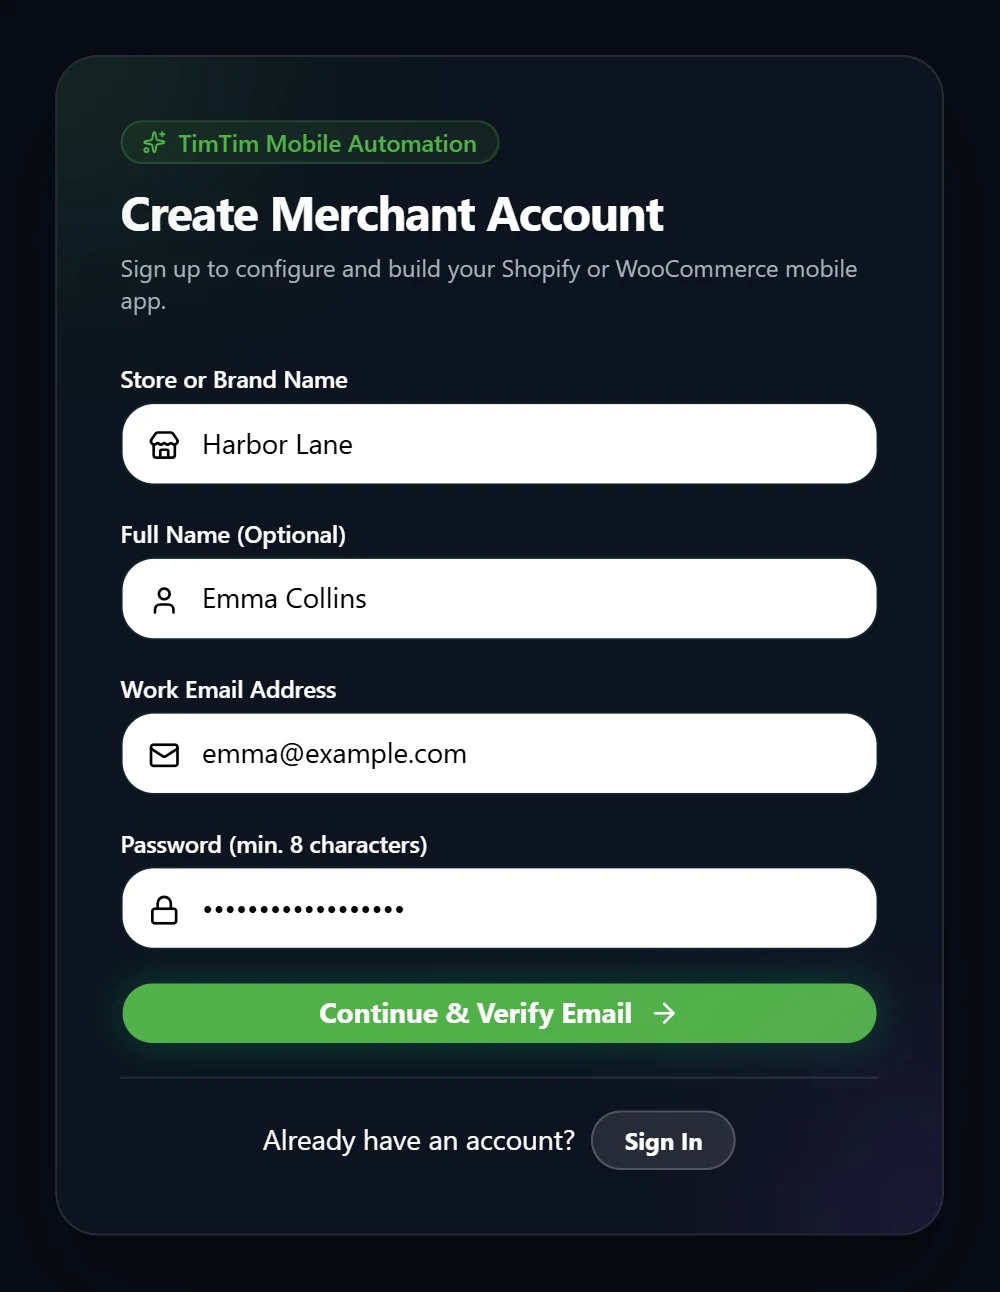
- On mytimtim.com, click Get Started.
- Enter your store or brand name, your name (optional), your work email and a password of at least 8 characters.
- Press Continue & Verify Email.
2Verify your email
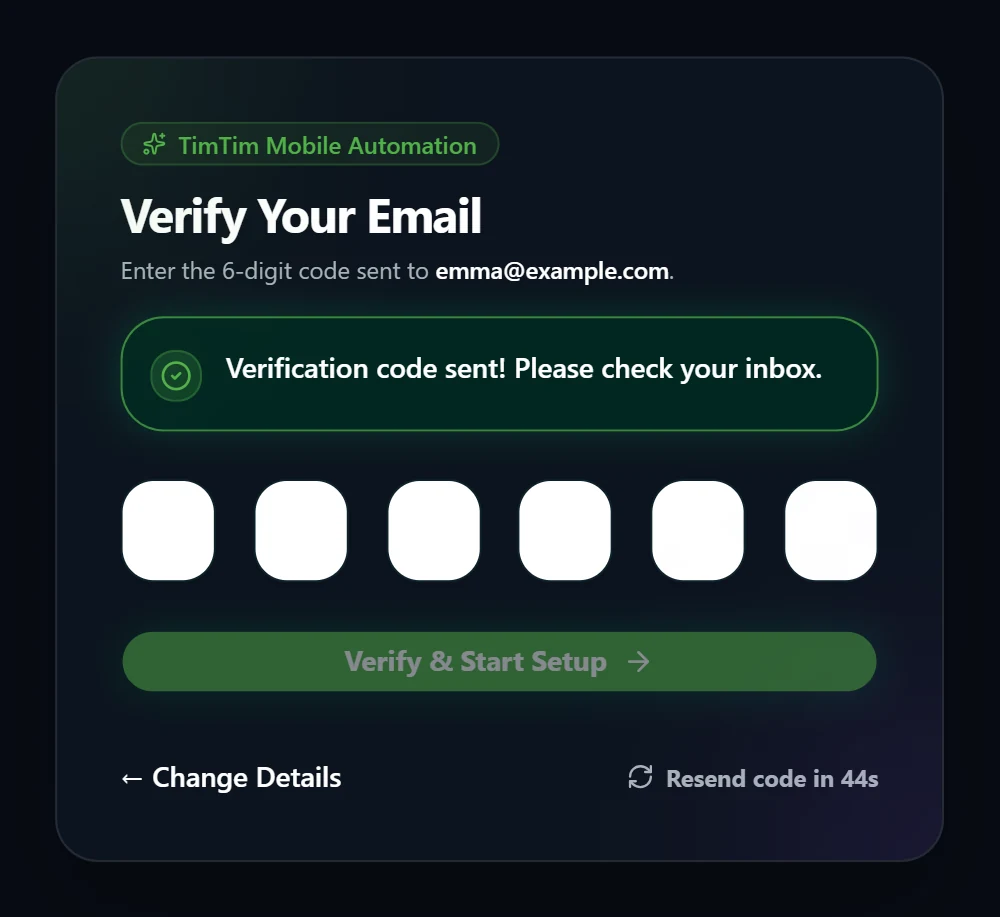
- Open the email from TimTim and type the 6-digit code. It is checked as soon as the sixth digit is in.
- No email? Check your spam folder, then press Resend Code. A new code can be sent every 45 seconds.
A code works for 10 minutes. After five wrong tries, ask for a new one. Once verified, you land in the setup form.
Part 2
Set up your app
Everything in the TimTim portal here is one form. Fill it top to bottom, then save once at the end (step 8).
3Get your Shopify token
The app reads your products through Shopify’s free Headless channel. Do this in your Shopify admin:
- Install the Headless channel from the Shopify App Store.
- Click Create storefront. Already have one? Go to Sales channels > Headless and click Add storefront.
- On the storefront’s page, find the Storefront API section and copy the Public access token.
The public token is read-only: it lets the app show products and fill a cart, with no access to your orders, customers or payouts.
4Connect your store
- On your dashboard, click Start App Setup (you may already be there).
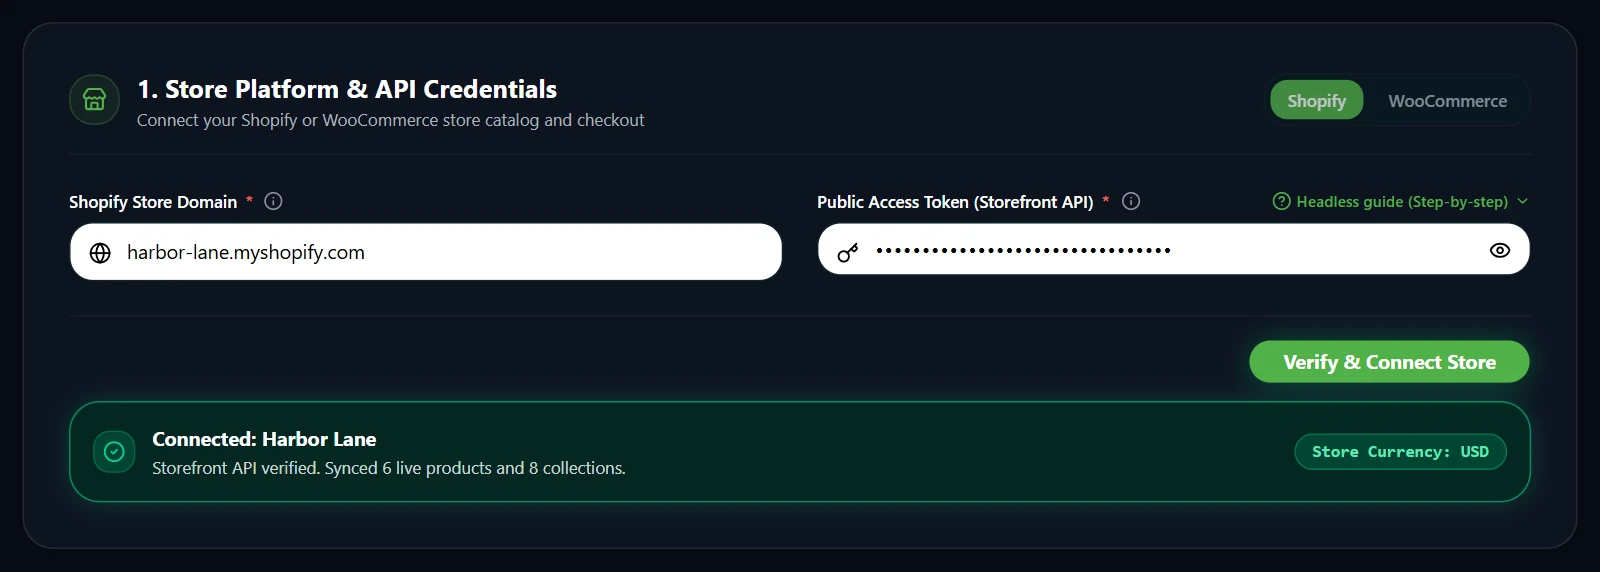
- Under 1. Store Platform & API Credentials, enter your store’s address ending in
.myshopify.comin Shopify Store Domain. - Paste the token into Public Access Token (Storefront API).
- Press Verify & Connect Store.
You see Connected: and your store’s name, and the currency is filled in for you. Use the .myshopify.com address even if your shop has its own domain. Find it in your Shopify admin under Settings > Domains.
5Choose platforms and name your app
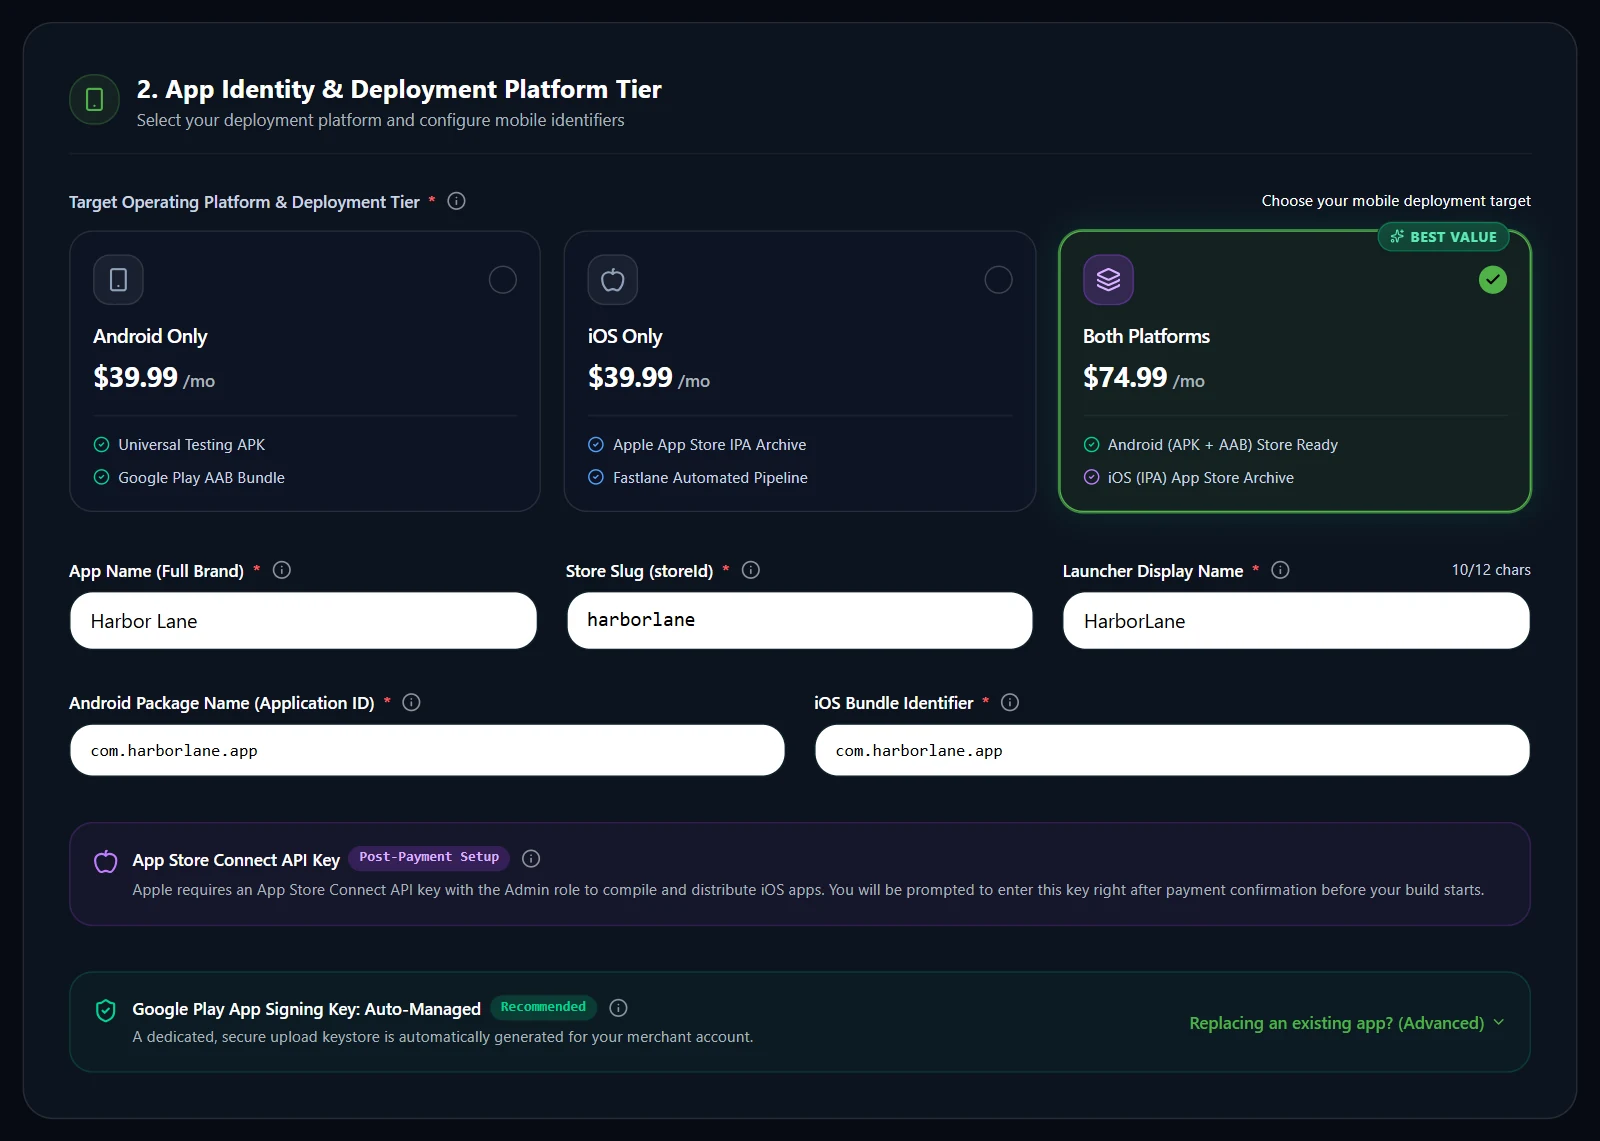
- Under 2. App Identity & Deployment Platform Tier, pick Android Only, iOS Only or Both Platforms.
- Enter App Name (Full Brand), the name on your store listing.
- Check Launcher Display Name, the label under the app icon: 12 characters at most, no spaces.
- Check Android Package Name and iOS Bundle Identifier, such as
com.yourbrand.app.
The package name and bundle ID are filled in from your app name, and they can’t change once the app is published. Leave Google Play App Signing Key on Auto-Managed, unless you are updating an app that is already on Google Play.
6Add currency, promo code and links
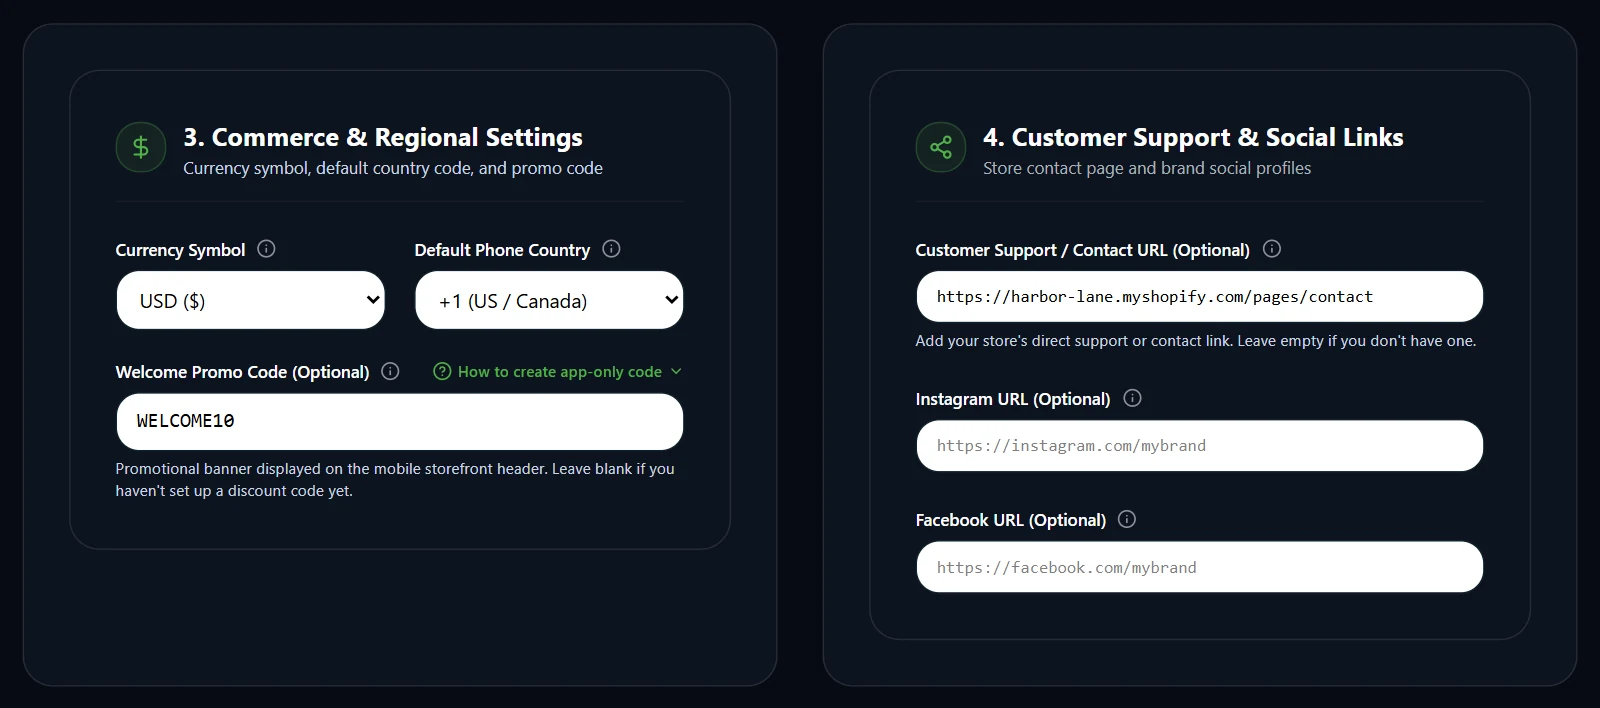
- Under 3. Commerce & Regional Settings, check the Currency Symbol and pick a Default Phone Country.
- Optional: enter a Welcome Promo Code. It shows as a banner at the top of the app.
- Under 4. Customer Support & Social Links, add your contact page, Instagram and Facebook links. All three are optional.
To make a code work only in the app, create it in Shopify with _APP on the end (such as APP10_APP) and tick Limit to one use per customer. Enter it here without the ending (APP10); the app applies the _APP version at checkout.
7Add your logo and colour
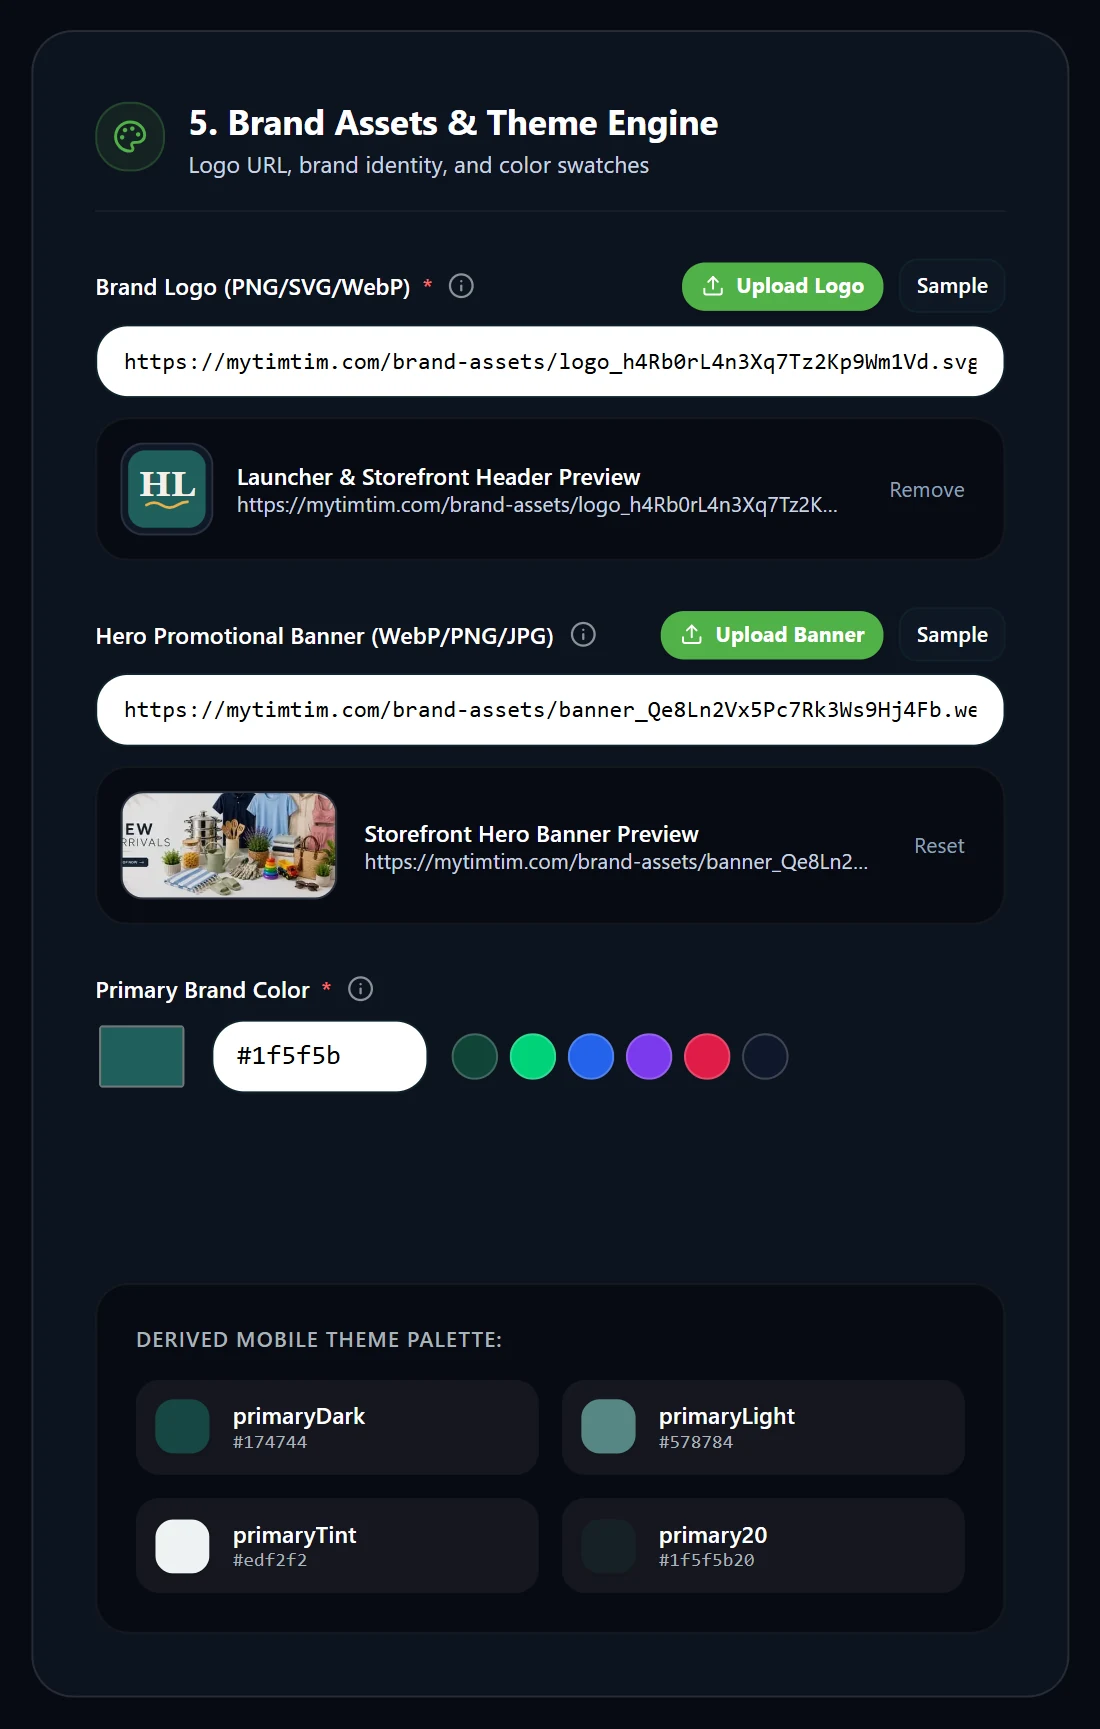
- Under 5. Brand Assets & Theme Engine, press Upload Logo.
- Optional: press Upload Banner for the big image on the app’s home screen.
- Pick your Primary Brand Color, or type its hex code, such as
#104437.
Upload the files rather than pasting links: the build downloads them, and a link that isn’t public stops it. The app’s other shades are made from your one colour.
8Preview and save
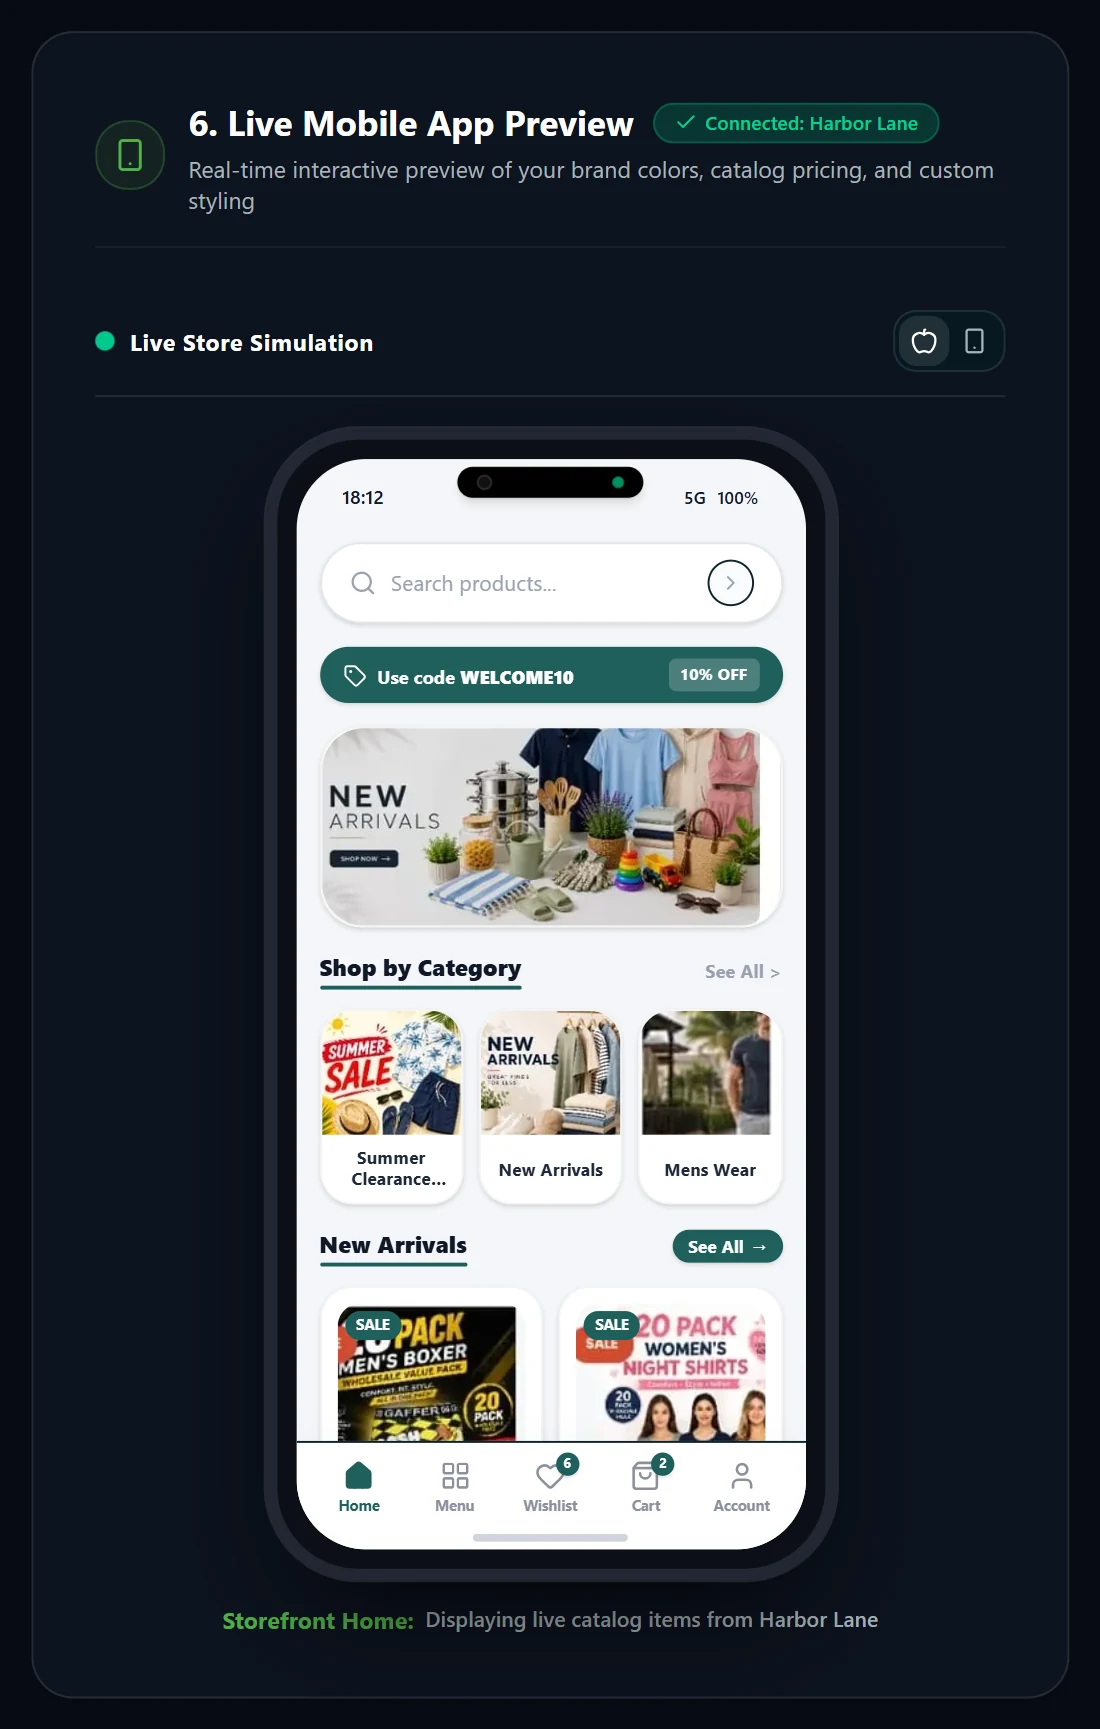
- Check 6. Live Mobile App Preview. It shows your products, prices and colours as the app will.
- Press Save Configuration & Proceed to Payment at the bottom of the page.
If something needs fixing, the message at the top of the form names the field.
Part 3
Pay and build
step 10, step 11 and step 12 are for iOS only. Building just Android? Skip straight to step 13.
9Choose a plan and pay
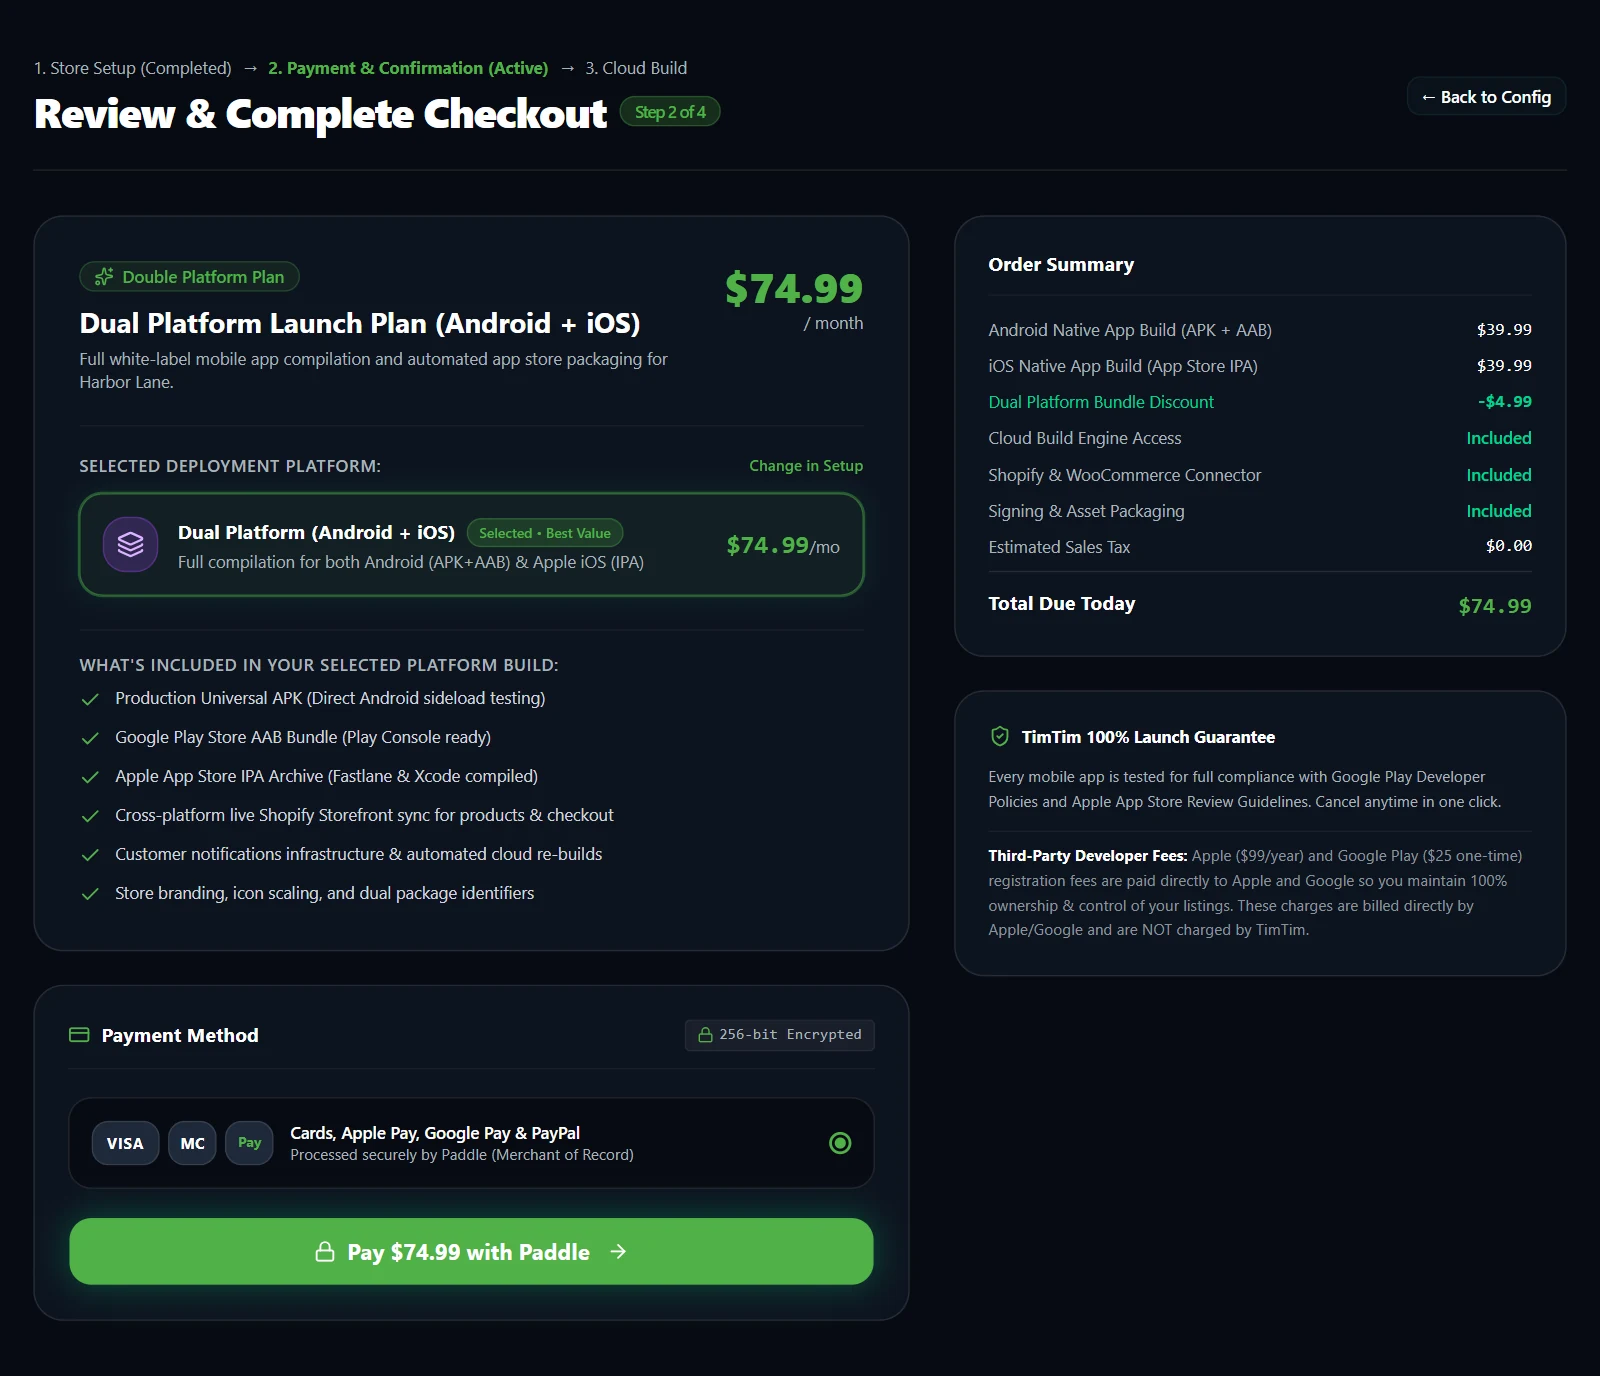
- Check your plan: Android Only or iOS Only at $39.99 a month, or both for $74.99 a month.
- Press Pay $39.99 with Paddle ($74.99 for both) and pay by card, Apple Pay, Google Pay or PayPal.
Paddle takes the payment and emails your receipt. Its “manage subscription” link is where you cancel.
10Create your Apple Developer account
Apple requires every app published to the App Store to come from the merchant’s own Apple Developer Program account. TimTim also uses your account’s automated API to compile, code-sign, and upload your iOS build.
Before you enroll — Choose your account type
- Organization (Company / LLC / Corp) — Recommended for stores: The seller name on your App Store listing displays your company name (e.g. Acme Apparel LLC), and you can invite team members with specific roles. Requires your legal corporate entity name, an official company website, and a D-U-N-S® Number (a free 9-digit identifier issued by Dun & Bradstreet — look it up with Apple’s D-U-N-S lookup or dnb.com).
- Individual: For sole proprietorships without an incorporated legal entity. The seller name on the App Store displays your legal personal name (e.g. John Smith) rather than your store brand, and team member accounts cannot be added.
Apple charges $99 USD per year directly. You will need an Apple ID with Two-Factor Authentication (2FA) turned on and an Apple device (iPhone, iPad or Mac).
- Install the Apple Developer app from the App Store on your iPhone or iPad (Apple’s fastest and preferred method), or open developer.apple.com/programs/enroll on the web.
- In the app, tap the Account tab and sign in with your Apple ID.
- Tap Enroll Now (or Start Your Enrollment) and tap Continue through the requirements.
- Enter your personal legal contact details (legal first and last name, phone number, and physical residential address).
- Verify your identity: on your Apple device, scan your government-issued photo ID (driver’s licence or passport) with the camera when prompted.
- Select your entity type: choose Company / Organization (or Individual). If Organization, enter your exact legal company name, D-U-N-S Number, headquarters address, phone, and corporate website.
- Review and accept the Apple Developer Program License Agreement.
- Pay the $99 annual membership fee using Apple Pay or a credit card.
Approval timeline: Apple usually approves Individual enrollments within 24 to 48 hours. Organization enrollments take 1 to 3 business days while Apple confirms your D-U-N-S corporate registry (Apple may call or email your contact person to verify authority). Once approved, you receive Apple’s “Welcome to the Apple Developer Program” email.
11Register your App ID and create the app
With your Apple Developer account active, register your app’s identifier and create its record in App Store Connect:
- Register your bundle ID: in Certificates, Identifiers & Profiles, open Identifiers, click +, choose App IDs, then App, and enter the iOS Bundle Identifier from step 5 (e.g.
com.yourbrand.app). - Create the app: in App Store Connect, open Apps, click +, then New App.
- Select iOS, enter your app name, select your primary language, choose the bundle ID you just registered, enter a SKU (such as
yourbrand-ios), select Full Access, and click Create.
The iOS build stops if the app record does not exist in App Store Connect yet, because Apple’s API requires the app container before provisioning signing certificates.
12Add your App Store Connect key
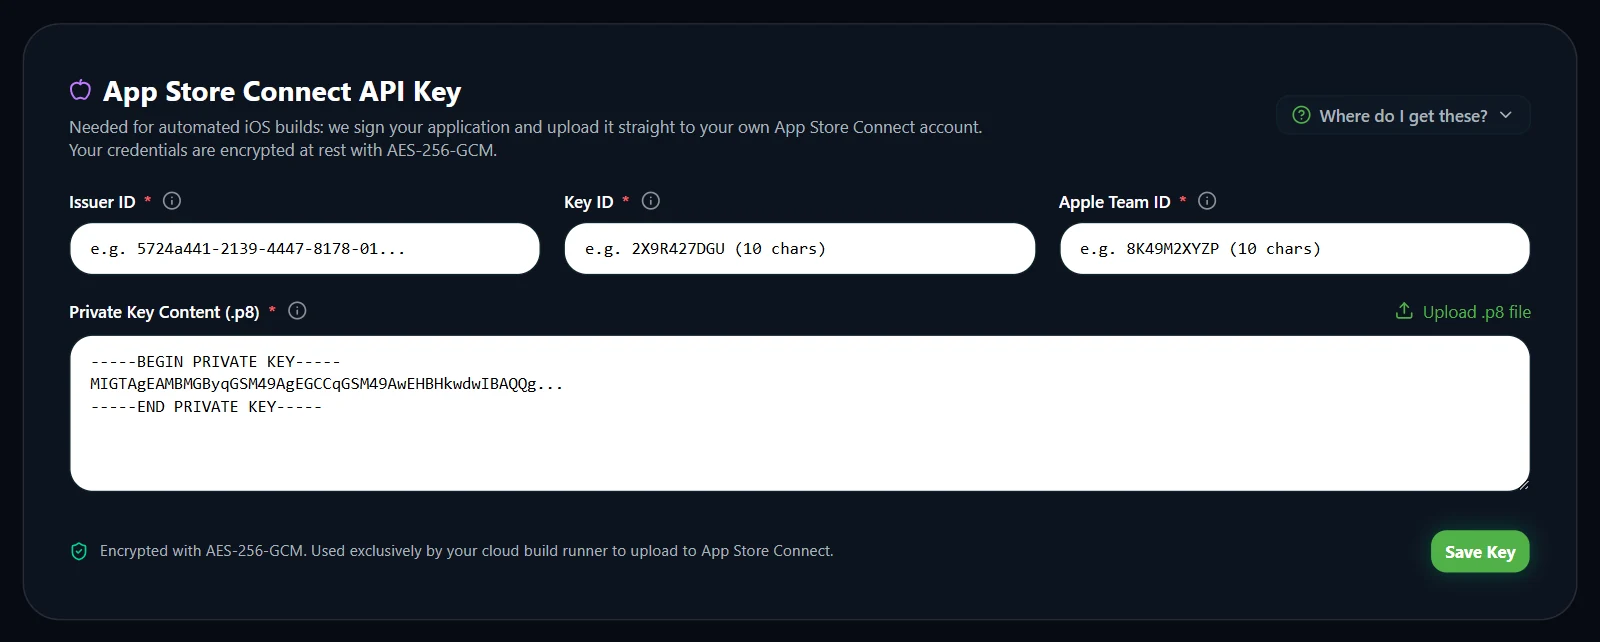
- In App Store Connect, open Users and Access, then Integrations, then App Store Connect API.
- Click + (the first time, Generate API Key), name the key (such as TimTim), choose Admin access and press Generate.
- Press Download API Key. Apple lets you download the
.p8file only once. - On your TimTim dashboard, under App Store Connect API Key, enter the Issuer ID, Key ID and Apple Team ID.
- Press Upload .p8 file, then Save Key.
The Issuer ID is at the top of Apple’s keys page and the Key ID is in the key’s row. Your Team ID is under Membership details on developer.apple.com/account. The key is stored encrypted.
13Start your build
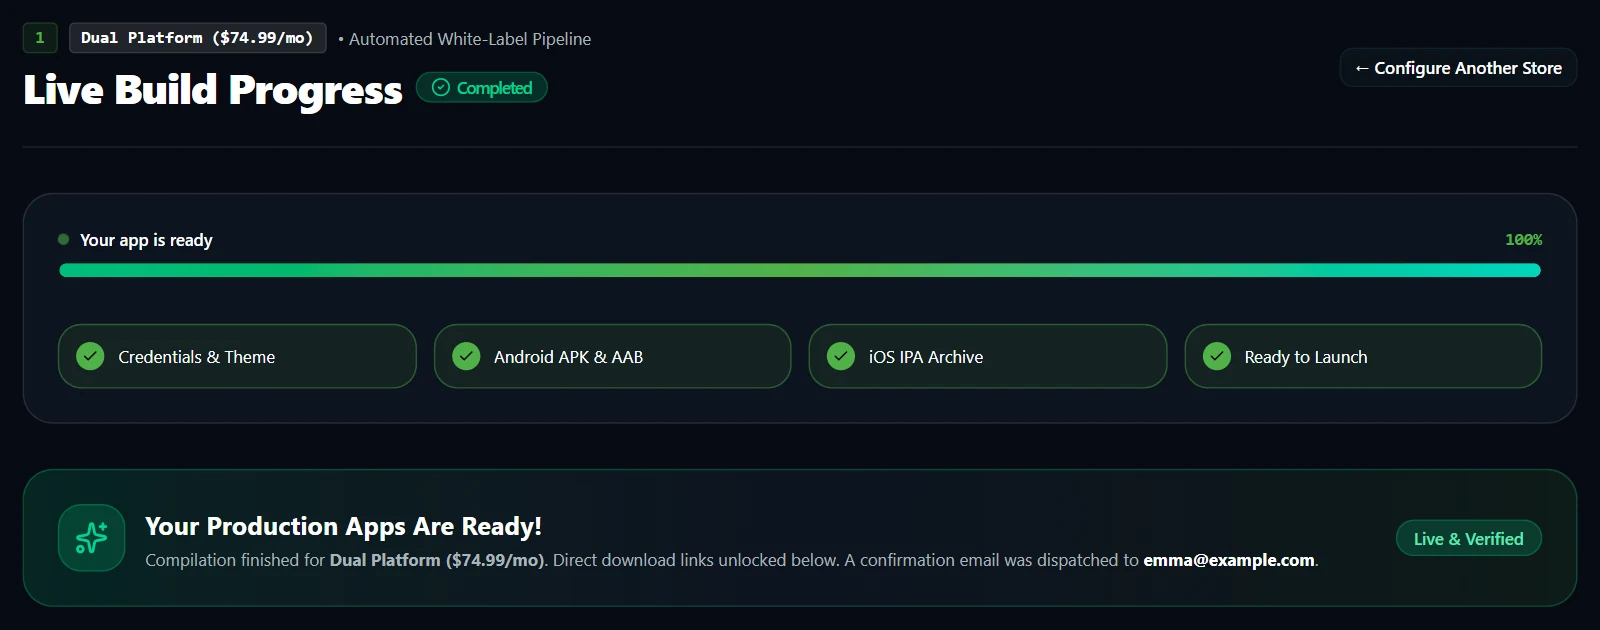
- Right after paying, press Launch Live Cloud Build. Later builds start from Start New Build on your dashboard.
- Watch Live Build Progress, or close the page: we email you when the build is ready.
Android is ready in under 40 minutes. iOS builds run overnight, when Apple build machines are free, and are usually ready within 24 hours; the page shows your place in line. Paid for both but no Apple key yet? Press Start Android Build Now and add the key later.
14Download your app files
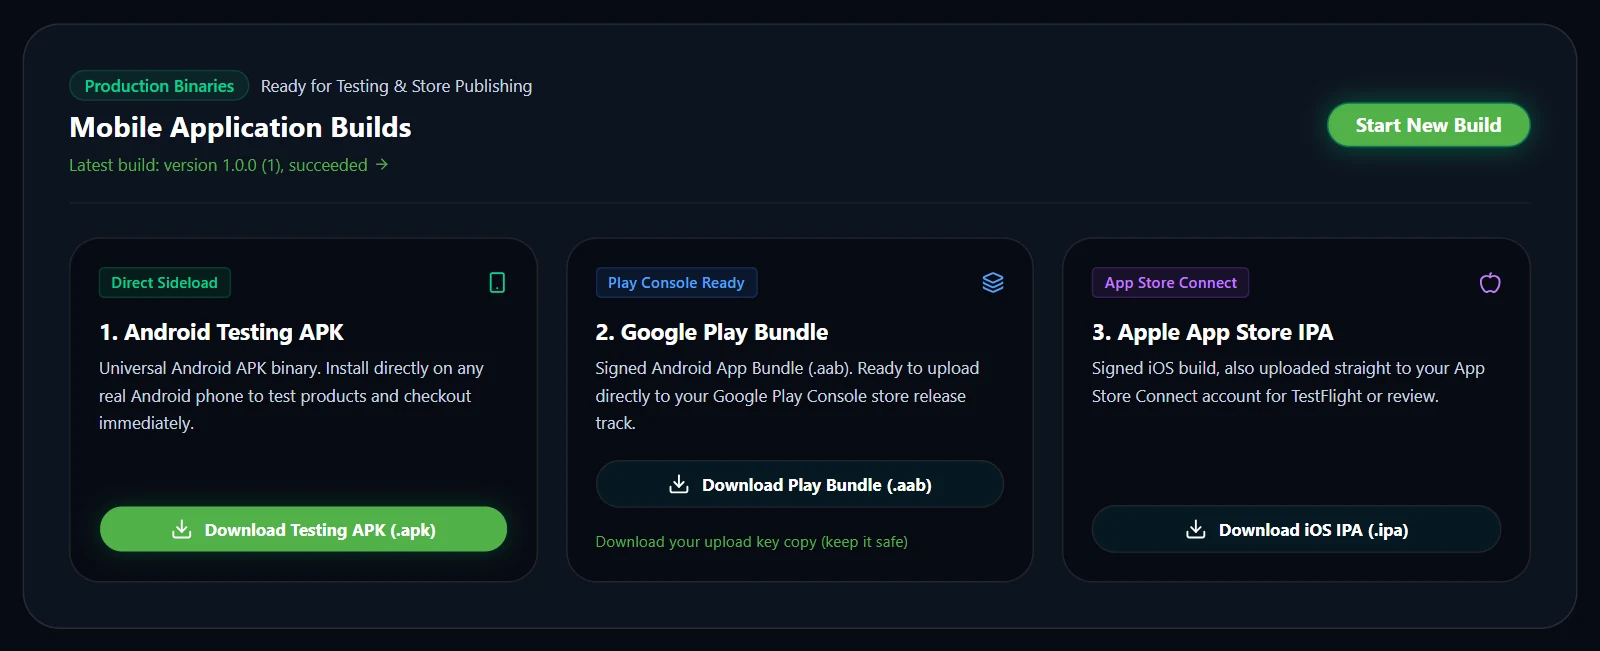
On your dashboard, under Mobile Application Builds:
- Download Testing APK (.apk) to try the app on an Android phone.
- Download Play Bundle (.aab), the file you upload to Google Play.
- Download your upload key copy and keep it somewhere safe.
- iOS needs nothing from you: the build is already in your App Store Connect account. Download iOS IPA (.ipa) keeps a copy.
The upload key proves an update comes from you. Google can reset a lost one, but it takes time, so back it up.
Part 4
Publish your app
You publish under your own developer accounts, so your store listings, ratings, and customer relationships are 100% yours. Need a hand? Book a call from Schedule 1-on-1 Submission Help on your dashboard.
15Test it on your phone
- Send the
.apkto an Android phone and open it. - If the phone asks, allow installs from that app, then press Install.
- Browse, add something to the cart and go through checkout once.
The APK is only for testing; customers get the app from Google Play. On iPhone, test with TestFlight instead (step 18).
16Create your Google Play Console account
Google requires all apps on Google Play to be published through your own Google Play Console developer account. Google charges a $25 USD one-time registration fee (no recurring annual fee).
Important Google requirement: Choose Organization vs Personal
- Organization (Company / Business) — Strongly recommended: Your public developer profile displays your business name, you can invite team members, and you can release directly to Production as soon as Google reviews your app. Requires your official company registration document, business address, and a D-U-N-S® Number (the same one used for Apple).
- Personal account — 14-day testing requirement: Under Google’s policy for accounts created after November 2023, personal developer accounts must run a closed test with at least 12 testers for 14 continuous days before Google enables the option to release to Production. If you have an LLC or company, always choose an Organization account to avoid this 14-day testing wait.
You will need a Google account (e.g. your work Google Workspace or dedicated business Gmail) with 2-Step Verification turned on, a credit/debit card for the $25 fee, and an official government ID for identity verification.
- Open play.google.com/console/signup and sign in with your Google account.
- Select your account type: choose An organization (recommended) or Yourself.
- Fill in your Developer Profile: enter your public Developer Name (the brand name shoppers see on Google Play), contact email, phone number, and address. Verify both email and phone with the codes Google sends.
- If Organization: enter your official business name, D-U-N-S number, registered address, and business phone.
- Read and accept the Google Play Developer Distribution Agreement.
- Pay the $25 registration fee with your card.
- Complete Identity Verification: on your Play Console dashboard, click Verify identity. Upload a photo of your government-issued photo ID (passport or driver’s licence) and, for organizations, your official business registration certificate.
Google typically reviews and verifies your identity within 1 to 3 business days. You can build your app in TimTim while waiting, and upload the bundle once verification is complete.
17Publish on Google Play
Once your Google Play Console account is verified (step 16), create your store listing and upload your app bundle:
- In Google Play Console, click Create app. Enter your app name, choose your default language, select App and Free, and accept the declarations.
- On the app dashboard, complete the Set up your app checklist: privacy policy URL, app access, ads declaration (select No), content rating questionnaire, and target audience (18+ or all ages).
- Complete the Data safety section: as an e-commerce shopping app, declare that data is collected for app functionality/account management, orders and payments are encrypted in transit, and customer data is processed securely via Shopify checkout.
- Under Main store listing, provide a short description (up to 80 characters), a full description, your app icon (512 × 512 px PNG), a feature graphic (1024 × 500 px), and at least four mobile screenshots.
- In the left menu, open Production, click Create new release, upload your
Play Bundle (.aab)from step 14, add release notes, and press Save and review release. - Click Start rollout to Production to submit your app for Google review.
Google’s review usually takes 2 to 4 business days. Once approved, your app is live and searchable on Google Play worldwide.
18Submit to the App Store
- In App Store Connect, open your app. The build shows under TestFlight once Apple has processed it.
- Optional: add yourself as a TestFlight tester and try the app on your iPhone.
- On the iOS version page, add your description, screenshots, privacy policy link and price, then choose the build.
- Press Add for Review, then submit.
Apple’s review usually takes 1 to 3 days. If a reviewer asks for changes, book a call and we’ll help.
Part 5
Manage and get help
19Change, upgrade and rebuild your app
As your store grows, you can change your app’s design, details, and features anytime, or upgrade to new platforms. TimTim manages build versioning and cryptographic signing automatically so store updates are accepted smoothly.
What you can change (requires a rebuild)
- App branding: Upload a new logo (updates app icon and splash screen) or home banner image.
- Brand colour: Pick a new hex colour — buttons, tabs, accents, and checkout highlights update automatically.
- App names: Change the full store name (up to 30 characters) or launcher icon name (up to 12 characters).
- Promo banner: Update your welcome discount code shown at the top of the app.
- Regional settings & links: Update currency symbol, default dialling code, or customer support and social links.
- Platform upgrade: Upgrade from single platform (e.g. Android only) to Dual Platform to launch on iOS.
- API credentials: Update your Shopify Storefront token or App Store Connect API key if rotated.
What updates live (no rebuild needed)
- Products & catalog: Adding, editing, or archiving products in your Shopify admin syncs to the app instantly.
- Prices & discounts: Price adjustments, compare-at prices, and Shopify sales appear immediately.
- Collections: Creating or reorganizing categories and featured collections updates live.
- Inventory & variants: Out-of-stock badges, sizes, colors, and stock levels reflect in real time.
- Orders: Customer orders flow directly into your Shopify orders dashboard with no delay.
com.yourbrand.app) and iOS Bundle ID cannot be changed once an app is live in the stores. Both Apple and Google identify your app by this unique identifier; changing it would publish as a completely new, separate app.How to release an app update
- On your TimTim dashboard, click Edit App Configuration.
- Update the fields you want to change (branding, colours, promo code, links, or platform) and press Save Configuration.
- Press Start New Build. TimTim automatically increments the build number (e.g. from Build 1 to Build 2) so Google and Apple accept the update.
- For Android: Download the new
Play Bundle (.aab)from your dashboard. In Google Play Console, go to Production > Create new release, upload the new.aab, write release notes, and press Start rollout to Production. - For iOS: TimTim automatically uploads the new build directly to your App Store Connect account. Open App Store Connect, go to your app, create a new version (or select the new build under your current version), and submit it for review.
Important: Never use Discard Builds once an app is live in either store. Discarding resets the internal build counter to 0, and Google Play and Apple will reject any upload with a build number equal to or lower than one they have already seen.
20Troubleshooting
Can't connect your store
- “Use your store’s .myshopify.com address”
- Enter the address ending in
.myshopify.com(Shopify admin, Settings > Domains), not your own domain. - “That isn’t a Storefront token”
- That token came from a custom app. Copy the Public access token from the Headless channel (step 3).
- “Connection Failed”
- Check that the address and the token come from the same store.
Can't verify your email
- “That code is wrong or has expired”
- Codes last 10 minutes. Press Resend Code and use the newest one.
A build failed
- App Store Connect Signing Issue
- Check that the key has Admin access, the three IDs are right, and the app exists in App Store Connect with your bundle ID (step 11). View technical runner error details on the build page shows Apple’s exact message.
- Android Keystore Verification Failed
- Only happens with your own keystore. Check the key alias and password, or switch back to Auto-Managed.
- Store Assets Could Not Be Downloaded
- Your logo or banner link isn’t public. Upload the files in the setup form instead.
- Build Pipeline Timed Out, or any other error
- Press Retry Build.
Can't start a build
- “Paddle is still confirming your payment”
- Wait a few seconds, then press the build button again.
Still stuck? Book a call with our team.
21FAQ
How long until my app is live?
Your Android app is built in under 40 minutes and your iOS app within 24 hours. After that it depends on store review: Apple usually takes 1 to 3 days and Google takes 2 to 4 days. Personal Google Play accounts must also run a 14-day closed test first; organization accounts skip this requirement.
Do I need my own Apple and Google accounts?
Yes. The app is published under your own developer accounts, so your store listings, customer reviews, and brand ownership are 100% yours. Google Play charges a one-time $25 fee and the Apple Developer Program costs $99 a year. Both are paid directly to Google and Apple, not to TimTim.
Do I need a new build when I change my products?
No. Products, collections and prices come live from your Shopify store. You only rebuild when you change the app itself, such as its name, logo or colours.
Does the setup work with WooCommerce?
The self-serve setup connects Shopify stores. If your store runs on WooCommerce, book a call with our team.
What does it cost?
$39.99 a month for Android or iOS, or $74.99 a month for both, paid through Paddle. Store fees to Apple and Google are separate.
How do I cancel?
Use the “manage subscription” link in your Paddle receipt email, or contact us. Your subscription stays active until the end of the billing period.
What happens to my app if I cancel?
It stays live in the stores under your developer accounts, but stops syncing with your store and receives no further updates.
Where is my customer data stored?
Products, orders and customer accounts stay in your Shopify store. TimTim does not keep a separate copy of your customer database.